Sunday, April 24, 2016

Reversing locky -- The juicy parts

Last post, we looked at Locky for the first time and attempted to unpack the main payload for analysis. This time, we will go in to some details on Locky behavior. I will not reverse all code path, but rather only give a summary of the main functionality of the routine. If you have time, please dive in, as I think the experience is very rewarding.

3. Config stuffs

Even after unpacking, the executable in memory is still not as easy to read as we would like. First, let’s open the dumped PE file in IDA. IDA probably will complains about not being able to resolves some addresses. That is fine. We may not be able to extract an executable that can run properly, but we can surely analyze Locky behavior with it.
Press Ctrl-E and go to “start” as the main entry. This should be the same function used for CreateThread earlier. If your IDA shows EBP-XXX instead of EBP+var_2C, for example, that means IDA does not recognize this function is using EBP based frame. Click on the name of “start”, and then press Alt-P, and check BP-based frame on the right panel. IDA will start to analyze and create all kinds of local variables and arguments.
At the “start” function, you should notice GetModuleHandle, and a few VirtualAlloc that looks suspicious. This is where the main configuration get decoded from inside the PE file. First, at 0x405174, eax is assigned edi, which is assigned the output of GetModuleHandleA from the call at 0x40515D. This is the very beginning of the image. Then, the malware starts to search for memory regions with the following property. If [eax] XOR 0x88BBDD8D == [eax + 4] AND [eax] XOR [0xDDBCA2B2] == [eax + 8] then EAX points at the beginning of the configuration block. We can derive that the configuration block is defined as:
typedef struct _configuration_block {
    DWORD dwMarker0;
    DWORD dwMarker1; // dwMarker1= dwMarker0 XOR 0x88BBDD8D
    DWORD dwMarker2; // dwMarker2 = dwMarker0 XOR 0xDDBCA2B2
    DWORD dwEncodedKey; //dwEncodedKey = dwKey XOR dwMarker0
    DWORD dwEncodedSize; //dwEncodedSize^dwMarker0= size
    VOID* pEncodedConfig
} ConfigBlock;
The encoded configuration block will be copied to a new memory region allocated at 0x4051E3. Then, at 0x405231, the same configuration block will be decoded into a new memory region allocated at 0x40520E. We can easily walk through this block of code to re-implement the search and decode part to grab the config out of any Locky sample. This part of code seems pretty consistent against a few samples of Locky that I have locked into.
Search and decode configuration


4. Fancy stuffs

The next interesting thing to look at is the function call at 0x40525F, which calls 0x406634. 0x406634 starts with calling 0x4064F3. This one look for the address of NtQueryVirtualMemory in ntdll.dll. Then, it compare the first byte with 0xB8, and compare the next few bytes with 0x00. This piece of code is verifying that the beginning of NtQueryVirtualMemory starts with a “mov eax” which, naturally, it does. NtQueryVirtualMemory sets EAX up with the right function number, before calling the dispatch SystemCall function to serve the request. In this case, if you disassemble the NtQueryVirtualMemory, the system call is 0x10B.
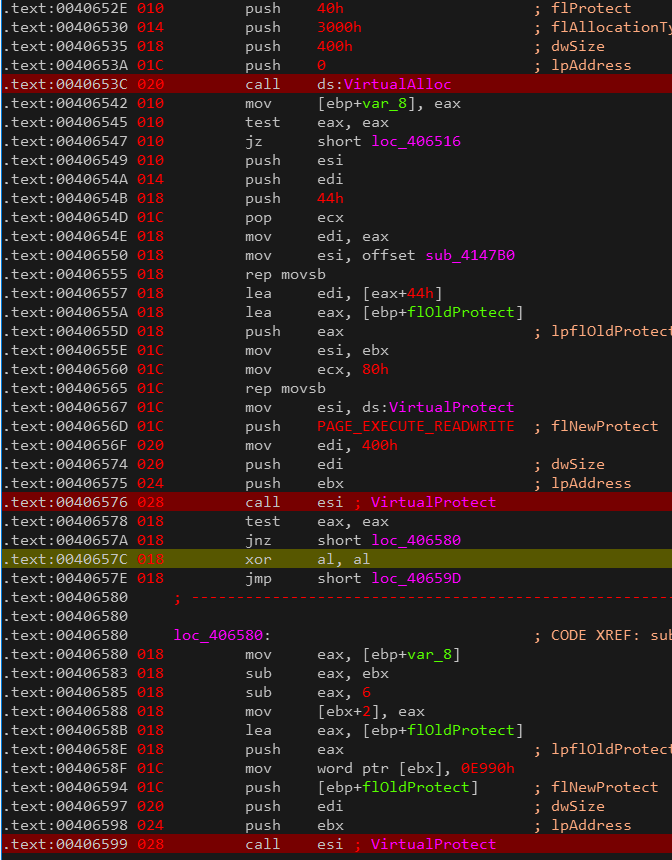
Going back to the malware, we see it checks NtQueryVirtualMemory to make sure it has not been changed. Then, we see a call to VirtualAlloc, a memcpy with rep movsb, two VirtualProtect, and ultimately the magic 0xE990 being stored at the beginning of NtQueryVirtualMemory at 0x40658F. 0xE990 is a relative jmp instruction. But, where does it jump to? It jumps to whatever is stored at location 0x406588, which, if you trace all the way back, is the memory region allocated at 0x40653C. This memory is copied over with the data from 0x4147B0, which we now call the Patch function.
In summary, subroutine 0x4064F3 checks NtQueryVirtualMemory to make sure no one plays with it. If no one patched the function, it will allocate a memory region, copy over the code from subroutine 0x4147B0, then patch NtQueryVirtualMemory to jmp to 0x4147B0. This function simply change the memory type of the returned data. We will see the significance of it soon.


5. Fancy stuffs 2

After the malware patches NtQueryVirtualMemory, it again allocate another 0x3000 bytes. This time, it copies over the entire image in memory to the new location at 0x406676 using rep movsb. Then it calls 0x4065A2, which looks like a lot of relocations is being fixed. Then Locky calls 0x406627 at 0x40668C. If you have been running things in a debugger (and hopefully in a VM), and try to step over this function, you will notice some strange behavior from your debugger. This function does not seem to return. Jumping in, at 0x40662D, locky stores the address of the return address into ECX. Then, it is overwritten with the value in EAX, which is the difference between EAX and the value of arg0. Taking a step back, arg0 is EBX, which is the address of this image in memory, and EAX is the newly allocated region which Locky allocated at 0x406664. Therefore, if the ret instruction executes, we will inevitably jump to the same offset, in the new memory region, and start to execute there. Locky also wipes the current image in memory with 0 at 0x4066BA.
VirtualAlloc 0x3000 bytes, and copy the image over to the new memory region at 0x406676


This function returns to another memory region. Return address is patched at 0x40662A
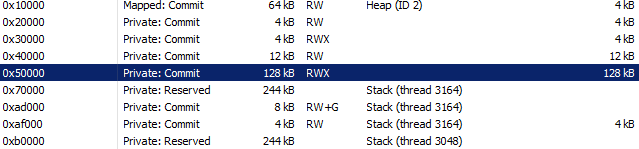
Now, if our OpSec engineer is checking this machine image, they will start noticing strange thing. The executable is running at a PRIVATE memory region (since we allocated and return to it). That is definitely not a normal behavior and would raise red flags. You know what would be normal? If the new memory region is of type IMAGE, which indicates the OS load the image at that region instead. That’s why Locky patch NtQueryVirtualMemory earlier to make sure its behavior does not stand out, too much.


6. Main stuffs

Locky moves on to call 0x40B4E1. If you have done a lot of reversing, you will notice that this function look somewhat familiar. There is __SEH_prolog, and GetStartupInfoW. It calls HeapSetInformation, and validate MZ and PE magic signature. It also call GetCommandLineA, and parse the command line into argc, argv. It is, indeed, CRTStartMain which eventually calls the main() function at 0x4B489.
A quick note on Locky and its string behavior. I believe Locky is using Visual Studio XString class to handle all their strings. Once feature that you need to be aware is that the XString has this prototype:
typedef struct __x_string {
    union {
        TCHAR* pszStr;
        TCHAR szStr[0x10];
    };
    DWORD len;
} XString;


If len is greater or equals to 0x10, the first four byte at offset 0x0 is a string pointer. If the length is less than 0x10, the string content is embedded inside the structure itself. The same thing applies to wchar strings, where the length will be checked against 0x08 instead of 0x10.
Following locky logic, at this point, looks pretty straight forward. At 0x44BC9, Locky calculates a unique ID using the volume name of the infected system. The ID is calculated at 0x46BD9. First, Locky gets the volume name. It then looks for the values between ‘{‘ and ‘}’, inclusive. Locky then calculate the MD5 of that string, and get the first 16 bytes as the ID for the infected system. This ID is used in various places throughout, including communicating with C2 server and calculating various random strings to store in the registry.
Locky then calculates a random string to store under HKCU\Software\. This string is derived from the system ID calculated earlier. All configurations will be stored under this key, including the public key received from C2 server, the ransom text, as well as the main flags indicating that the entire system has been encrypted. To protect yourself against this version of Locky, simply setting this flag to YES will cause locky to stop executing.
Locky then starts to gather system information at 0x44D35 and request a public key from C2 server. If you have PCAP of the communication to and from C2, you can used the scripts provided to decode all traffic.
Now, you can look at the details of Locky operation. The main encryption code for C2 communication is between 0x47D5D and 0x47DB5. Using XOR property, we can derive the decryption code for it in the attached script in client_encrypt and client_decrypt functions. The main decryption part for data received from C2 is between 0x47FDB and 0x4802C. We can also derive the encryption logic in the attached script under server_encryption and server_decrypt.
All messages between the sample and C2 use the following format:
[0x10 bytes of MD5 of plaintext][plain-text, variable length]
The entire message is then encrypted using client_encrypt if it is from the infected system, or server_encrypt if it comes from C2 server. Knowing that, you can mock your own C2 server to play with the sample as you see fit.
Locky then enumerates all logical volumes, and create a worker thread for each volume. The thread starts out searching for all interesting files, with all the extensions included in the sample. The list of include extensions is at 0x54224. This sample also skips windows specific directories and files, which are listed at 0x5CD8. The thread then add all the interesting files into a list, then go on to encrypt each file in the list.
For each file, it generates a random 0x10 bytes at 0x4256F, and encrypts the 0x10 bytes using the C2 public key. The 0x10 bytes randomly generated is used as a session key to encrypt each file using AES 128 or AES 192 algorithm. The thread also appends the following FileInfo structure at the end of each file:

typedef _File_Info {
    DWORD magic0; // 0x8956FE93
    BYTE SystemID[0x10];
    BYTE SessionKey[0x100];
    DWORD magic1; //0xD41BA12A
    CHAR szOriginalFileName[MAX_PATH];
    _WIN32_FILE_ATTRIBUTE_DATA FileAttribute;
} FileInfo;
For each of the file, the malware also generates a new random name using the following format:
[0x10 bytes SystemID][0x10 bytes random hex string].locky
The filename generation happens between 0x422CD and 0x4240C. You can follow along using the debugger to see how the names are generated and used. After all the files are encrypted, the thread for each volume will send the statistic back to C2 server.
The main thread will wait for all worker threads to finish, before setting the Desktop Wallpaper to the instruction text received from the C2 server. The text is customized based on the infected system default language.

At this point, I believe we have a fairly good understanding of Locky. There are lots of code to cover, and lots of optimization and in-line code that make analysis a pain in the butt. But, which a debugger attached as we walk through the code, it helps identify the function’s behavior without fully going into the details of STLs. Walk along with the code and annotate IDA as you go, it will greatly help clear things up.


#!/bin/env python

# htnhan aka khoai huynh[.]t[.]nhan[@]gmail_dot_com
# implements most of locky crypto stuffs:
# client_encrypt: Encrypts data coming from malware to C2
#                 calculate and prepend MD5 yourself please.
# client_decrypt: Decrypts stuffs encrypted with client_encrypt
# server_encrypt: Encrypts data coming from C2 to malware.
#                 alculate and prepend MD5 yourself please.
# server_decrypt: Decrypts stuffs encrypted with server_encrypt
# gensystemid   : Get volume name and generate SystemID from it
# genregkey     : Generate registry keys using SystemID to store
#        - Main config stuffs at HKCU\Software\<string0>
#        - C2 PUBLICKEYBLOB   at HKCU\Software\<string0>\<string2>
#        - instructions text  at HKCU\Software\<string0>\<string3>
#        - YES flag           at HKCU\Software\<string0>\<string4>

import sys
import ctypes
import hashlib


K0 = 0xCD43EF19
K1 = 0xAFF49754


# rol, ror are stolen from somewhere on the internet....
# with some modification.
# maybe https://gist.github.com/c633/a7a5cde5ce1b679d3c0a
rol = lambda val, r_bits:  \
    (val << r_bits%32) & (2**32-1) | \
    ((val & (2**32-1)) >> (32-(r_bits%32)))


ror = lambda val, r_bits:  \
    ((val & (2**32-1)) >> r_bits%32) | \
    (val << (32-(r_bits%32)) & (2**32-1))


def client_encrypt(idata):
    '''encryption part for client'''
    key = K0
    plain = bytearray(idata)
    ctext = bytearray()
    for i, v in enumerate(plain):
        ctext.append(((ror(key,0x05) - rol(i 0x0D) & 0xFF) ^ v) & 0xFF)
        tmp = rol(v, (i & 0xFF) & 0x1F) + ror(key, 0x1)
        key = tmp ^ (ror(i, 0x17) + 0x53702f68) & 0xFFFFFFFF
    return ctext


def client_decrypt(idata):
    '''This one decrypts things encrypted by the infected system'''
    key = K0
    plain = bytearray(idata)
    ctext = bytearray()
    for i, v in enumerate(plain):
        n = ((ror(key, 0x05) - rol(i, 0x0D) & 0xFF) ^ v) & 0xFF
        ctext.append(n)
        tmp = rol(n, (i & 0xFF) & 0x1F) + ror(key, 0x1)
        key = tmp ^ (ror(i, 0x17) + 0x53702f68) & 0xFFFFFFFF
    return ctext


def server_encrypt(idata):
    '''This one encrypt data on C2 before sending to Locky'''
    key = K1
    ctext = bytearray(idata)
    ptext = bytearray()
    for i, v in enumerate(ctext):
        num = (v - i - rol(key, 0x03)) & 0xFF
        ptext.append(num)
        key = (key+ror(num,0x0B)^rol(key,0x05)^i-0x47CB0D2F)&0xFFFFFFFF
    return ptext


def server_decrypt(idata):
    '''This one decrypts data received from C2.'''
    key = K1
    ctext = bytearray(idata)
    ptext = bytearray()
    for i, v in enumerate(ctext):
        num = (v - i - rol(key, 0x03)) & 0xFF
        ptext.append(num)
        key = (key+ror(num,0x0B)^rol(key,0x05)^i-0x47CB0D2F)&0xFFFFFFFF
    return ptext


def pprint(buf):
    for i, v in enumerate(buf):
        if i % 0x10 == 0: print ''
        print "%02X" % (v,),


def shrd(dst, src, cnt):
    return (((src << 32) + dst) >> cnt) & 0xFFFFFFFF


def shld(dst, src, cnt):
    out = ((src << 32) + dst) << cnt
    out |= (src >> 32-cnt)
    return out & 0xFFFFFFFF


def myadd(a, b):
    out = a + b
    c = out > (2**32-1)
    return 0xFFFFFFFF & (out), c


ROUND = 7
def mycrypt(h, l, idx):
    for i in xrange(ROUND):
        eax = shrd(l, h, 0x19) ^ (0xFFFFFFFF & (l << 7))
        ecx = shld(h, l, 0x07) ^ (h >> 0x19)

        esi, c = myadd(rol(i, 7), eax)
        edi = (ecx+c) & 0xFFFFFFFF

        esi, c = myadd(esi, 0xFFFFFFFF & (idx< string
        0x02:   value name to store C2 publickeyblob
        0x03:   value name to store instructions text
        0x04:   value name to mark encryption finished
      System ID can be generated with gensystemid.
    '''
    h, l = int(idstr[:8], 16), int(idstr[8:], 16)
    out = str()
    h, l = mycrypt(h, l, idx)
    size = 0x8 + (shrd(l, h, 0x5) & 0x7)


    for i in range(size):
        h, l = mycrypt(h, l, i)
        tmp = (l & 0xff) - 1

        h, l = mycrypt(h, l, i)
        value = l & 0xff

        if tmp % 3 == 0:
            ascii_code = (value % 26) + ord('A')
        elif tmp % 3 == 1:
            ascii_code = (value % 26) + ord('a')
        else:
            ascii_code = (value % 10) + ord('0')
        out += chr(ascii_code)
    return out


def getvolname():
    kernel32 = ctypes.windll.kernel32
    buf = ctypes.create_unicode_buffer(1024)

    kernel32.GetVolumeNameForVolumeMountPointW(
        ctypes.c_wchar_p("C:\\"),
        buf,
        ctypes.sizeof(buf)
    )
    return buf.value


def gensystemid():
    vname=getvolname()
    print vname
    n1, n2 = vname.index('{'), vname.index('}')
    vname = vname[n1:n2+1]
    print vname
    m = hashlib.md5()
    m.update(vname)
    sid = m.hexdigest()[:0x10].upper()
    return sid


if __name__ == '__main__':
    print 'Generating registry keys....'
    SID = gensystemid()
    for idx in [0, 2, 3, 4, 0xFFFFFFFB]:
        print '0x%08x - %s' % (idx, genregkey(SID, idx))

Reversing locky -- First look

Ransomware has been the main focus of many blogs, talks and complaints recently. They come in all shapes and sizes. One day last week, I had a chance to look at a variant of Locky. You can find many articles on Locky ransomware. However, the majority of the articles focus on behavior, delivery methods and features. Instead, I am interested in the bits and bytes of the main pay load. I want to know how Locky is designed, how it works, and how it may fail. Hence, this post!
I would like to provide a walkthrough for main reversing process. I try to not have any "magic" decision like "set a break point at 0x12345 and see that it is unpacked". But, I rather you travel with me through the decision making process of why we look at function XYZ and why we break at 0x12345. Feel free to play a long, or, just read for your own entertainment.

0. Pre-Req:

I assume you are comfortable with reversing and debugging malware. I assume you use a virtual machine technology of some kind. Please do not infect yourself. If you are looking for a commodity sample, malwr[11] and virustotal[12] are both great sources. You also need the following toys to play along:
  • A virtual machine software. There are many choices: VMware [1] and VirtualBox [2] are probably the most common. Pick one that suits your preference.
  • A Microsoft Windows virtual machine. I use Windows 7 x86. XP works as well. I have not tested on Windows 8, 8.1 or 10, but I assume they work just fine.
  • A debugger. I use Microsoft Windbg[3]. OllyDb[4], ImmunityDebugger[5] are two other common options.
  • A disassembler. I use IDA[6]. The freeware version works just fine. If you have another alternative to IDA, please, please, please let me know.
  • PEiD[7] is still a very nice tool for generic PE information. The KANAL plugin is very useful in many cases.
  • CFF explorer[8] is a nice free tool for viewing the PE file info as well.
  • Tools for searching for strings. I use Linux strings command. Make sure you also check strings -el for windows Unicode strings in the sample.
  • Process Hacker[9] is a great tool to monitor a process behavior.
  • Process Monitor[10 from SysInternal suite is also great to record many events happen over time. It does, however, generates a lot of noise, so it’s best to filter out unnecessary operations or processes before running your sample.

1. First look:

The first look turns out to be great. PEiD reports that the file is not packed. CFF explorer shows complete import table, as well as plenty of proper sections. Running strings on the sample reveals many, many strings, which is always a good sign that the sample is not pack. All these are great signs, as packed malware is a lot tougher to handle. Let’s open up in IDA and see what it does.

PEiD shows that file is not packed.

CFF explorer shows full import table

And "proper" sections


IDA shows WinMain to be pretty simple. However, poking around a little shows that the sample is either encrypted or packed with an unknown packer. We see there is no real structure to the code. There are many global variables and constants being used. All of this make analysis impossible.
This is one prime example why we should not trust our tools completely. It is always best to verify with a disassembler and check the code execution.

2. Unpack

Since this sample is not packed by a standard packer, we have to unpack it manually. The most common approach is looking for the end of decryption/unpacking stub and set a break point there. However, after many attempts, I have not found a good location for that just by looking at the assembly code.
Process Hacker shows a RWX memory region committed.

Instead, I turn to the dynamic analysis tools. I let the malware run, and capture its events. As you can see Process Hacker shows a few memory region with RWX permission. It is a good indication that such region is allocated and filled out by the unpacking stub before resuming its execution there. We also see a new thread created and executing in a different memory region. Therefore, I try to set a breakpoint at CreateThread API, hoping to catch its execution. Make sure you have debugging symbols loaded for windows dll. Using windbg, set your break point using
bp kernel32!CreateThreadStub
If you use OllyDebugger or ImmunityDebugger, within the assembly panel, type Ctrl-G, and type in “CreateThread”. Olly will takes you to CreateThread entry point. There, you can set a break point using F2.

A new thread is created at 0x5152

A CreateThread even in Process Monitor.


Now continue execution until CreateThread is called. You will be able to see the address of the new thread.

WinDbg breakpoint at kernel32!CreateThreadStub
And the breakpoint at the ThreadFunction at 0x405152 hits

Next, we need to dump the image in memory, and fix up the entry point for it. If you are using Olly, there is a plugin call OllyDump that can achieve the task easily. For Windbg, I use Scylla to archive such task. Select the process, and click “File”->”Dump”. Then, you can fix the original entry piont OEP and use IAT auto search to search for the import address table (IAT). Click GetImports to verify all the imports are fixed properly. You can also use ImportREC, which is shown in the screenshot below.

ImportREC shows all import resolves properly.

Now that we have successfully unpack Locky, we can look into its real behavior in the next post.

Links:
[1] - https://my.vmware.com/
[2] - https://www.virtualbox.org/wiki/Downloads
[3] - https://msdn.microsoft.com/en-us/windows/hardware/hh852365.aspx
[4] - http://www.ollydbg.de/
[5] - https://www.immunityinc.com/products/debugger/
[6] - https://www.hex-rays.com/products/ida/support/download.shtml
[7] - https://www.aldeid.com/wiki/PEiD
[8] - http://www.ntcore.com/exsuite.php
[9] - http://processhacker.sourceforge.net/
[10] - https://technet.microsoft.com/en-us/sysinternals/processmonitor.aspx
[11] - https://malwr.com/
[12] - https://www.virustotal.com/

Tuesday, June 9, 2015

Mac, Fusion, and Serial Console

I use a Mac. I use Fusion. So far, so good.

One day, I want to debug window kernel. I have two VMWare Fusion VMs. So...how hard can it be!

Well, Fusion (at least with 7.1) does not give you the pretty GUI for configuring serial port. Yes, you can add a serial port. But no, you may not connect that port to another port on another VM. What the hell.... So, after quite some pain trying to connect two VMs in Fusion, I noted the steps here to make life easier for me, and for others.


  • Make sure you have 2 VMs: One debugger, aka the god mode machine. With an attached debugger, you can pretty much tell the other guy what to do. One debugee, aka your sand box, playbox, what ever. Make sure you know and remember which one is which.
  • Add a serial port to both machines, using the pretty GUI and your shiny Mac. Use whatever names you want for the port/file. If you can not get pass this step, please close the laptop and stop reading.
  • Power off both machines cleanly.
  • Open the VMX file for your debugger machine with your favorite text editor. I use VI. Now, depend on the number of serial ports you have, the number X in "serialX" may change. Add these settings to your debugger:
  • serialX.fileType = "pipe"
    serialX.fileName = "/path/to/temporary_pipe"
    serialX.pipe.endPoint = "client"
  • Open the VMX file on your debugee. Also, add these settings to the proper serial device:
  • serialX.fileType = "pipe"
    serialX.fileName = "/path/to/temporary_pipe"
    serialX.pipe.endPoint = "client"
  • Voila, done!
If you have an easier (official) way to do it, please let me know.

Friday, July 19, 2013

python and double underscore

As we all know, python itself does not really have  inheritance protections. A child can safely call and/or overwrite the parents' methods/attributes/etc freely. There is no compile time check to make sure the child does not call anything "private" from its parent; or if the parents are trying to access child's methods or properties.

This is by design of the "duck-typing" philosophy, adapted by python: "Give it a shot, if it works, great! If it does not work, well...exception will handle that" (more on this duck-typing another time). But, by convention, python does provide a fake level of protection for private methods. Give this code a run and try to understand:

class Foo(object):
    def __init__(self):
        super(Foo, self).__init__()
        self._one = "this is from Foo"
        self.__two = "this is from Foo too"

    def _getone(self):
        print self._one

    def __gettwo(self):
        print self.__two

    def gettwo(self):
        self.__gettwo()

if __name__ == '__main__':
    f = Foo()
    f._getone()
    try:
        f.__gettwo()
    except:
        traceback.print_exc()
    f.gettwo()


f._getone() will call _getone() method, passing the first argument as f -- an instance of Foo object (the self argument). Everything works as expected, we saw the string "this is from Foo"

f.__gettwo()....raise an exception. There is no __gettwo() method. What the heck? We just defined it!

f.gettwo() will call self.__gettwo() internally, and this time, it works. Why?

Look look: When you dic(f), here is what we get:
['_Foo__gettwo', '_Foo__two', '__class__', '__delattr__', '__dict__', '__doc__', '__format__', '__getattribute__', '__hash__', '__init__', '__module__', '__new__', '__reduce__', '__reduce_ex__', '__repr__', '__setattr__', '__sizeof__', '__str__', '__subclasshook__', '__weakref__', '_getone', '_one', 'gettwo']


Foo class does not have a __gettwo() method, but a _Foo__gettwo() instead! YAY, now we know why there is not a __gettwo() method. Python, by convention, mingle the class name with the method name IF the name starts with double underscore. If you try to call self.__method_name(), Python is smart enough to replace __method_name with _Classname__method_name(), and works as expected. Any external calls to __method_name() will fail since the Class itself does not provide such a method. Same thing for __instance. This provides a "fake" protection from direct manipulation externally.

This also affects inheritance. Since __method_name never exists, you can not try to overwrite with a sub class without using its parents' name. Same goes for attributes:

class Bar(Foo):
    def __init__(self):
        super(Bar, self).__init__()
        self._one = "this is from Bar"
        self.__two = "this is from Bar too"

    def _getone(self):
        print "Bar:", self._one

    def __gettwo(self):
        print "Bar:", self.__two
if __name__ == '__main__':
    b = Bar()
    b._getone()
    try:
        b.__gettwo()
    except:
        traceback.print_exc()
    b.gettwo()

b._getone() will work as expected, while b.gettwo() will print _Foo__two instead.

This cost me an hour of debug time. Hopefully you don't have to do the same.

Wednesday, July 3, 2013

Juniper Network Connect on Arch Linux

Stupid juniper has one of the worst thing ever to connect to their VPN. Juniper Network Connect for linux includes a bunch of scripts (for installations), jar files (for various GUI and logging facility), and native code (for manipulating the network stacks) with dependencies to some very old libs. And guess what, they are all lib32. To make it work cleanly on a 64bit linux machine requires lots of google, downloads, and various fixing and hacking. Hopefully, this entry summarizes it all and make a decent reference document.

Installation:

  1. Install jre 7 32 bit, any version. Recommended Oracle JRE instead of OpenJRE
  2. ln -s /path/to/jre/lib/i386/libnpjp2.so $HOME/.mozilla/plugin/
  3. Install whatever packages containing route and ifconfig
    On archlinux, it means the net-tools
  4. Install lib32-xrender, which is needed by the stupid GUI
Now, my system is a 64bit archlinux. You need to edit /etc/pacman.conf, and uncomment the multi-lib section to allow multilib to be installed. 
  1. Grab the bin32-jre from AUR, do a quick makepkg -s --asroot to install them
  2. link only for local user. The others may not need jre 32bit
  3. pacman -S net-tools
  4. pacman -S lib32-libxrender

Configuration:

  1. Get the ncLinuxApp.jar
  2. Get your VPN gateway cert + Realm
  3. Configure ncsvc
  4. Run it
1. Get ncLinuxApp.jar
Go to your VPN gateway with firefox. The reason why we link the 32bit jre is for firefox to start and download ncLinuxApp.jar for you. Login with your username/password combination, and click the "Start" button to start the download. You may have to agree to run the app from your gateway. Once the app is finished running, you should see a $HOME/.juniper_network/ directory with all the downloaded content

2. Get VPN cert and Realm
Again, visit your VPN gateway. Now, right-click on the page, and select "View Page Info". Click on the Security Tab.

Now, click View Certificate; then Details, then Export. Now, save that cert using DER format. 

Close all poped up windows. Stay at the VPN gateway, right click and 'View source'. Ctr-F to find "realm". This will show your Realm

3. Configure ncsvc
Now, open up a terminal. cd into $HOME/.juniper_networks. You will see ncLinuxApp.jar. Use your favorite tool to unzip that. You will find NC.jar and ncsvc.
  • sudo chown root:root ncsvc
  • sudo chmod 4755 ncsvc
You may need to ldd ncsvc to make sure you have all the libraries installed.
That's it

4. Run and connect:
cd into your Juniper App directory.
/path/to/jre32/bin/java -jar NC.jar -h your.vpn.gw
-u username -f /path/to/certificate -r "your realm" -L 5
You can cleanly script the last few three steps to make it more robust. However, I find that a little overkill

Wednesday, October 19, 2011

Back on exploit

It's been over two years since I last got my chance to play around with exploits and security; and I probably won't touch it till a friend asks me for help on a wargame on io.smashthestack.org. 

The level is simple enough, yet it took me over an hour to get the shell. Rusty! But that's not the point of the level. Here is a rough overview of level9 challenge:

  • main() calls do_sth_nasty() with argv
  • do_sth_nasty() use strncpy and strncat to a local buffer for agrv[1] and argv[2].
  • There is no check on argc, argv[1], and argv[2], blah blah
Now forcing level8 binary to spawn a shell is way simple. It seems the host does not configure ASLR. Even so, we can easily local attack and put the shellcode on env[]. My friend did the same, and easy enough he got the shell. But, he can't seem to read the password, which stays in a file under /home/level9. level8 has been suid, and owned by user level9...why can't he just spawn the shell and read the password...? 

The problem is, most linux and many other major *nix OS do not support switching effective user id based on suid bit on executable file. If the user is already root, she can easily drop down to a normal user. But if real uid is not root, then linux execve do not allow effective UID of the new process to be anything different.  One more important thing, bash shell also try to detect if real UID is different from effective UID, and will switch back to RUID unless RUID is 0.

So....what can we do? There are a few potential solutions for this level, all of which I did not have a chance to test:

  1. Forget the shell. We know where the password file is already, instead of spawning the shell, just open(), read() and close() the file directly already.
  2. Set the Real, Effective and Saved UID into the new user level9 as soon as the shellcode execute. Then, we can spawn a shell, and bash will happily stay as level9.
Either solution require us to write our own shellcode (meh, you should anyways. Never trust any bits/bytes downloaded from the net); and, the size of the shell code may increase pass the 32bytes allocated (kind of, not counting alignment and compiler changes).

As you can see, the point of the level is not about spawning a shell; but trying to overcome other security measure the environment happen to have. Most people don't even have a solid understanding of UID, EUID, RUID and SUID, let alone how the OS or the shell handle the cases. Moreover, security measures change rapidly, as attack vectors and technology improves themselves. If you feel too comfortable with yourself, you've fallen behind.

Thursday, July 22, 2010

Beer!

Check this out!


Saturday, April 17, 2010

Technology lession -- Ease of use

If the cat can use it, so can we! The onlything is, I'd never let my pet play with my wife...

Sunday, April 11, 2010

Cheating...


Steven....you are so screwed